

Table of Contents
- Why Sitting Comfortably During Meditation Is a Skill, Not a Talent
- Meditation Posture for Beginners: Build the Base Before You Sit
- Choosing the Best Meditation Cushion for Back Pain and Hip Discomfort
- Shoulders, Neck, Hands, and Breath: Fine-Tuning the Upper Body
- How Long to Meditate for Beginners Without Burning Out Your Body
- Warm-Ups and Desk-Worker Ergonomics: The Two Fixes Most Guides Skip
- Troubleshooting Guide: Numb Legs, Aching Backs, and Sinking Cushions
- Frequently Asked Questions
Last Updated: September 12, 2026
Why Sitting Comfortably During Meditation Is a Skill, Not a Talent
Learning how to sit comfortably during meditation is a trainable physical skill, not an innate gift. Discomfort usually signals a fixable setup problem: hips too high or too low, a collapsing spine, or the wrong cushion. This guide from Kusha Cushions breaks down the anatomy, props, and troubleshooting that turn a fidgety sit into a stable one.
The core tension in every seated practice: your pelvis wants to tip backward, your spine wants to stay upright. Resolve that conflict and the rest of the body follows.
Meditation Posture for Beginners: Build the Base Before You Sit
Meditation posture for beginners starts with one principle: the pelvis must sit higher than the knees. When your hips are elevated above your knee line, the thighbones angle downward and the lumbar spine settles into its natural inward curve without effort.
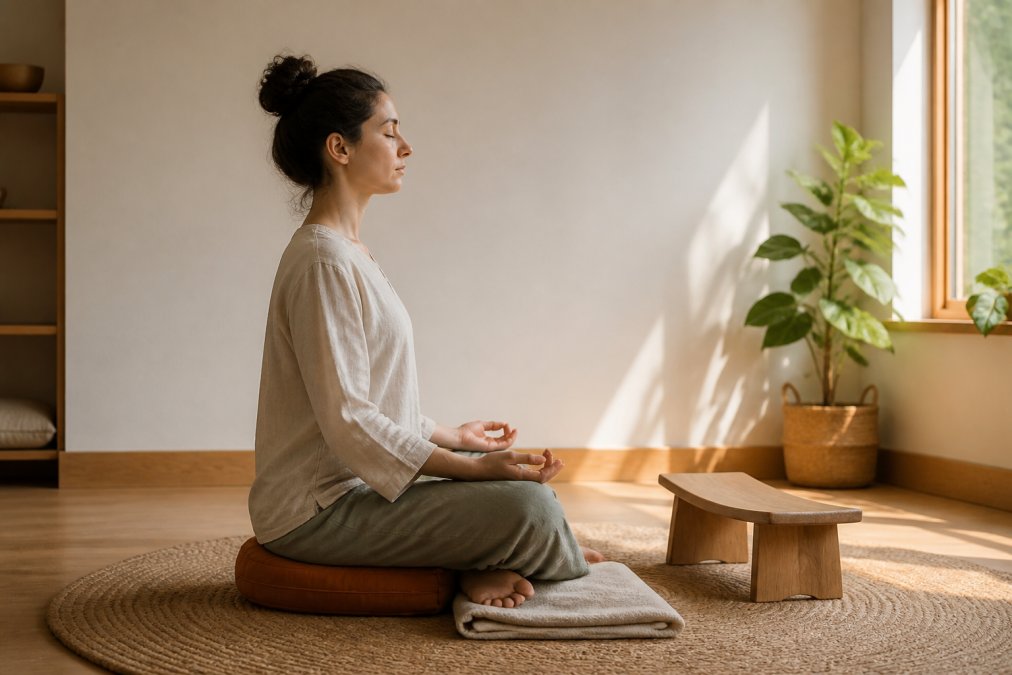
Common Seated Positions: Lotus, Half-Lotus, Burmese, and Seiza
Four positions cover almost every practitioner. Full lotus demands significant hip rotation and is not a starting point. Half-lotus asks for less. Burmese, with both feet on the floor in front of you, is the most forgiving cross-legged option. Seiza, kneeling with a bench or cushion between the legs, suits hips that will not externally rotate at all.
The National Center for Complementary and Integrative Health overview of meditation notes that no single posture is required for meditation to work. Pick the position your joints allow today, not the one a photo suggests.
Hips, Pelvis, and Spinal Alignment: The Three Cues That Matter
Three cues do most of the work:
- Anterior pelvic tilt. Rock your pelvis forward slightly so the sitting bones press down and the belly softens.
- Stack, don't straighten. Imagine a string lifting the crown of your head. Do not pull your shoulders back.
- Ground the base. Feel both sitting bones and both knees making contact.
A neutral spine held by stacked bones costs almost no energy; one held by clenched muscle costs everything.
Choosing the Best Meditation Cushion for Back Pain and Hip Discomfort
The best meditation cushion for back pain raises your hips enough to let the lumbar curve return on its own. Height, firmness, and shape matter more than fabric or color. A soft, overstuffed cushion compresses under load and drops your hips below your knees within minutes.
Kusha Cushions builds its cushions around exactly this problem. With 30 years of professional upholstery experience and 20 years providing cushions to the meditation community, the design brief has stayed the same: hold the hips at the right height, session after session.
Cushions, Benches, and Props: What Each One Actually Does
| Prop | What It Does | Best For |
|---|---|---|
| Zafu (round cushion) | Raises hips, tilts pelvis forward | Cross-legged sitters with tight hips |
| Zabuton (flat mat) | Cushions knees and ankles | Anyone sitting on a hard floor |
| Meditation bench | Removes ankle strain entirely | Knee or ankle discomfort |
| Folded blanket | Fine-tunes height by 1-2 cm | Adjusting an existing setup |
| Knee support block | Reduces hip flexor pull | Long sessions, tight hips |
A zafu paired with a zabuton handles most beginners; a bench solves ankle pain no cushion can fix. Blankets are your adjustment tool, not your foundation.
Shoulders, Neck, Hands, and Breath: Fine-Tuning the Upper Body
Upper-body tension is usually a symptom, not the disease. If your shoulders creep toward your ears, your base is probably too low and your core is overworking. Fix the pelvis first, then work upward: neck, shoulders, arms, hands, breath.
Neck and Jaw
The neck holds more tension than most sitters realize. Two cues reset it:
- Lengthen the back of the neck. Imagine the crown of your head drawn straight up, not forward. The chin tucks a fraction, enough to bring your ears back over your shoulders.
- Unclench the jaw. Let the tongue rest on the floor of the mouth, teeth slightly apart. A clenched jaw pulls the suboccipital muscles at the base of the skull, which pulls the neck forward.
If your chin drifts up you strain the back of the neck; if it drifts down you compress the throat. The middle path is a level gaze, eyes soft or closed.
Shoulders
Let the shoulder blades slide down and slightly together, without pinching. The cue is "broaden the collarbones," not "pull the shoulders back", pulling back over-arches the upper back and creates a new tension pattern within minutes. Self-check: shrug your shoulders up to your ears, hold three seconds, then let them drop. The drop is where they should stay.
Arms and Hands
Hand placement is a small decision with a real effect on alertness:
- Palms down on the knees. Grounding, settling, good for drowsy mornings or anxious sits.
- Palms up, one resting in the other at the lap. Traditional and slightly more alerting; the open chest position discourages slumping.
- Hands in the lap, palms up, thumbs lightly touching. Common in several contemplative traditions; keeps the elbows close to the ribs and the shoulders relaxed.
Whichever you choose, keep the elbows slightly bent and the upper arms close to the torso. Flared elbows pull the shoulder blades apart and fatigue the upper back.
Breath Mechanics in a Seated Position
Diaphragmatic breathing is the fastest tension release available. A slow exhale drops the shoulders more reliably than any instruction to relax them. The diaphragm is a dome-shaped muscle under the lungs: when it contracts, it drops, the belly expands, and the lower ribs flare slightly outward; when it releases, the belly draws back in and the exhale happens passively. Chest breathing, where the shoulders and upper ribs lift instead, recruits the neck and shoulder muscles on every breath, which is why chest breathers feel tight after ten minutes.
To find diaphragmatic breathing in a seated posture:
- Place one hand on the belly and one on the chest.
- Inhale through the nose for a count of four. Only the belly hand should move.
- Exhale through the nose for a count of six. The longer exhale is what triggers the parasympathetic response.
- Repeat for ten breaths before settling into your practice.
If the chest hand moves more than the belly hand, your base is likely too low and your core is bracing. Check hip height before working further on the breath.
A Quick Upper-Body Reset Sequence
Run this 60-second sequence at the start of any sit where you feel stiff:
- Three slow neck rolls, half-circle only (ear to shoulder, not full circles).
- Five shoulder shrugs, up and release.
- Five slow shoulder rolls backward.
- Three deep diaphragmatic breaths with the hand check above.
This is not a stretch routine, it is a reset. It tells the nervous system where neutral is before you ask the body to hold it.
How Long to Meditate for Beginners Without Burning Out Your Body
How long to meditate for beginners is a physical question as much as a mental one. Start with five to ten minutes per session, and add two to three minutes only after a full week at the current length with no next-day soreness (nccih.nih.gov). The body adapts gradually; jumping straight to thirty minutes on a new cushion is how people end up with aching hips and an abandoned practice.
Warm-Ups and Desk-Worker Ergonomics: The Two Fixes Most Guides Skip
Most meditation guides start with the pose. That is backwards. The pose you can hold comfortably is determined by the hips, hamstrings, and lower back you bring to the cushion, and for desk workers, those tissues have already been shaped by eight hours of sitting before you cross your legs. Two preparation habits separate practitioners who sit comfortably from those who don't, and most guides skip both.
A Five-Minute Pre-Meditation Warm-Up
Cold hips resist external rotation; warm hips allow it. This five-minute routine targets the four areas that limit seated comfort: hip flexors, hamstrings, adductors, and the lower back.
1. Cat-cow spinal rolls (60 seconds). On hands and knees, alternate arching and rounding the spine with the breath. This wakes up segmental movement and releases the lower back before it holds a static curve.
2. Figure-four hip stretch (60 seconds per side). Lie on your back, cross one ankle over the opposite knee, and draw the uncrossed thigh toward your chest. This opens the piriformis and external rotators, the muscles that determine whether half-lotus is available today.
3. Low lunge hip flexor stretch (45 seconds per side). Kneel on one knee, other foot forward, and press the hips gently forward until you feel a stretch at the front of the kneeling hip. Desk workers usually find this the tightest area of all.
4. Seated forward fold (60 seconds). Sit with legs extended, hinge from the hips, and let the spine lengthen rather than round. This addresses hamstring tightness, which tilts the pelvis backward and forces the lumbar spine to round.
5. Slow neck rotations (30 seconds). Turn the head left and right, pausing at the end range. Do not roll the head in full circles.
You are not trying to gain flexibility in five minutes, you are removing the stiffness that makes the first ten minutes of a sit feel like a negotiation.
Desk-Worker Ergonomics: Fix the Chair You Sit In All Day
If you spend your workday in a chair with a collapsed pelvis, your hip flexors shorten and your lower back stiffens before you reach your cushion. Practitioners who fix their desk posture often find their meditation posture improves without any other change. Four adjustments matter most:
- Chair height. Set your work chair so your hips sit level with or slightly above your knees. This is the same principle as your meditation cushion, applied to the other eight hours of your day.
- Lumbar support. A small cushion or a chair with a built-in lumbar curve keeps the lower back from rounding. The OSHA guidance on workstation ergonomics covers chair height, lumbar support, and monitor placement in detail.
- Feet flat. If your feet dangle, add a footrest. Dangling feet pull the pelvis forward and round the lower back.
- Stand and move every hour. Set a timer. Two minutes of standing, walking, or a hip flexor stretch resets the tissue before it stiffens into a pattern.
The Tech-Neck Connection
If your head is forward of your shoulders all day, the classic screen posture, your upper back rounds and your neck extensors stay contracted. That pattern follows you to the cushion as shoulder tension in the first five minutes, and no amount of "relax your shoulders" instruction will fix it. The fix is upstream: raise your monitor so the top of the screen is at or slightly below eye level, and pull it close enough that you are not leaning forward to read. Then run the upper-body reset sequence before you sit.
A Realistic Timeline
Do not expect overnight change. A common pattern is:
- Weeks 1-2. Warm-ups make the first ten minutes of a sit noticeably easier. Desk adjustments reduce end-of-day stiffness.
- Weeks 3-6. Hip external rotation improves enough that cross-legged sitting feels stable rather than forced.
- Weeks 6-12. Hamstring and hip flexor length allow longer sits without the pelvis tipping backward.
This is also the foundation for progressing from a chair to the floor over several months; without the warm-up routine, the body has no reason to adapt.
Troubleshooting Guide: Numb Legs, Aching Backs, and Sinking Cushions
Most seated discomfort traces to a handful of causes. Match your symptom to the fix.
| Symptom | Likely Cause | Fix |
|---|---|---|
| Numb feet or legs | Knees higher than hips, nerve compression | Add cushion height; switch to a bench |
| Lower back ache | Pelvis tipped back, lumbar rounded | Raise hips; check cushion firmness |
| Sinking mid-session | Cushion compressing under load | Switch to a firmer, higher-density fill |
| Knee pain | Insufficient external hip rotation | Use seiza or a bench instead |
| Shoulder tension | Base too low, core overworking | Rebuild the base before adjusting arms |
| Hip flexor pull | Unsupported knees | Add a knee block or folded blanket |
If a fix does not resolve the discomfort within a few sessions, change the position rather than pushing through. Pain is information about your setup.
Kusha Cushions addresses the sinking-cushion problem directly with a posture-first design and a lifetime guarantee on cover and workmanship. If you are a larger person worried about compressing a cushion flat, that guarantee exists because the fill and stitching are built to hold their shape. Compare the current range and find your fit on the Kusha Cushions site.
Sitting comfortably during meditation is a solvable problem, and the solution is almost always mechanical: hips above knees, spine stacked, the right prop under you. Build the base, warm up the hips, and fix the desk chair you spend nine hours in. Kusha Cushions makes handcrafted, posture-first cushions with a lifetime guarantee on cover and workmanship, plus a mobile cushion set for practice on the road. Get started with Kusha Cushions and sit through your next session without negotiating with your back.
Frequently Asked Questions
What is the best position to sit in for meditation?
There is no single best position, but the most sustainable options are Burmese (both calves flat on the floor, ankles stacked in front), kneeling on a bench, or sitting on a chair with feet flat. The position that works is the one where your pelvis tilts slightly forward, your spine stays upright without muscular effort, and your knees rest at or below hip level. If your knees sit above your hips, raise your seat until they drop.
How can I stop my legs from falling asleep during meditation?
Numb legs usually come from pressure on nerves or blood vessels behind the knee, not from sitting too long. Raise your cushion height so your hips sit above your knees, avoid pressing the top ankle hard into the calf, and shift your weight slowly every few minutes. A zabuton mat under your cushion spreads pressure across the shins and ankles. If numbness persists past a minute or two after standing, shorten your sits and build up gradually.
Do I need a meditation cushion, or can I just sit on the floor?
You can sit on the floor, but most people need 3 to 6 inches of lift under the hips to get the pelvis tilted forward and the knees down. A firm cushion, a folded blanket, or a meditation bench all do this. Soft, squishy cushions fail because they compress under weight and let the pelvis roll backward, which rounds the lower back. Look for a firm fill that holds its height through a full session.
How long should a beginner sit, and when should I add time?
Start with 5 to 10 minutes daily and keep the same seat and time for two weeks before adding anything. Once 10 minutes feels steady, add 5 minutes every week or two. Consistency matters more than duration: a daily 10-minute sit builds the hip flexibility and core endurance that make longer sessions comfortable. If pain shows up before the timer ends, stop and note where it started.