

Table of Contents
- Quick Comparison: Best Meditation Cushions for Hip Pain
- How to Sit Comfortably During Meditation When Your Hips Hurt
- Meditation Posture for Hip Pain: Alignment That Takes Pressure Off Your Joints
- Meditation Cushion Height Guide: Finding Your Ideal Elevation
- Top Picks: Kusha Cushions for Hip Pain Relief
- Cushion Maintenance and Longevity: Making Your Investment Last
- Stretches and Habits That Support Hip Health During Meditation
- Frequently Asked Questions
Last Updated: September 14, 2026
Quick Comparison: Best Meditation Cushions for Hip Pain
Hip pain during meditation usually traces back to one problem: your hips sit lower than your knees, which tilts the pelvis and loads the joint. The best meditation cushion for hip pain fixes that geometry by raising the seat until the pelvis rotates forward and the spine stacks naturally. At Kusha Cushions, we've spent 20 years providing cushions to the community, observing how elevation, firmness, and fill material change what practitioners feel after twenty minutes on the floor.
| Cushion | Height | Fill | Price | Best For |
|---|---|---|---|---|
| Moon | 5" | Buckwheat hulls | $70 | Targeted hip and thigh support |
| Earth Moon Bundle | 7" combined | Buckwheat + high-resiliency foam | $135 | Wider leg postures, complete seat |
| Earth | 2" | High-resiliency foam | $80 | Knee, ankle, and base support |
The Moon works for most people with hip discomfort; the bundle suits wide cross-legged stances; the Earth handles knees and ankles and doubles as the foundation for either.

How to Sit Comfortably During Meditation When Your Hips Hurt
Sitting comfortably with sore hips comes down to three adjustments: raise your seat until your knees drop below your hip crease, tilt the pelvis slightly forward, and distribute weight across the sitting bones rather than the tailbone. Most people skip the first step and wonder why five minutes feels like an hour.
A common mistake is sinking into a soft, flat cushion because it feels plush at first. Within ten minutes the fill compresses, the hips drop, and the lower back rounds. Cleveland Clinic guidance on sitting posture and back pain makes the same point about support surfaces: firm, consistent elevation beats softness every time.
Start with a cushion that holds its shape, then adjust height before anything else.
Meditation Posture for Hip Pain: Alignment That Takes Pressure Off Your Joints
Good meditation posture for hip pain starts with the pelvis, not the shoulders. When the pelvis tilts forward even slightly, the lumbar curve returns, the spine stacks without muscular effort, and the hip joint opens instead of pinching. The hip is a ball-and-socket joint: with the knee at or below the hip crease, the femoral head rotates cleanly in the acetabulum. Drop the knees above the hip crease and the femur presses into the front of the socket, where most cross-legged hip pain originates.
Walk through the setup in order:
- Sit toward the front third of your cushion so the sitting bones rest on the highest point
- Let the knees fall below the hip crease, using height to get there rather than force
- Rock gently side to side, then front to back, and settle at the midpoint
- Lengthen through the crown without lifting the chin
- Rest the hands on the thighs and let the shoulders drop
That front-edge position matters more than people expect. Sitting dead center on a cushion encourages a rounded lower back, which is exactly the posture that aggravates hip and tailbone discomfort. NIH information on low back pain and posture notes that sustained poor positioning, not any single movement, is what typically drives chronic discomfort.
A 30-Second Self-Check for Pelvic Tilt
Before you settle in, place one hand on your lower belly and the other on your lower back. If the belly hand sits noticeably higher, your pelvis is in a posterior tilt (tucked) and your hips are compressed. If the hands feel roughly level, you're in neutral. If the back hand sits higher, you're in an anterior tilt, fine as long as your lower back isn't straining.
Most people with hip pain default to a posterior tilt because it feels "safe", but it loads the hip flexors and compresses the front of the joint over a long sit. The fix is almost always more elevation, not more effort.
Why One-Sided Hip Pain Happens
Asymmetry is the norm, not the exception. A common pattern is a tighter right hip from years of driving, desk sitting with one foot tucked, or carrying a bag on one shoulder. Cross-legged, that tighter side pulls the pelvis into a slight rotation, loading one hip more than the other, a dull ache in the groin or outer hip on just one side.
What Not to Do
Three habits reliably worsen hip pain:
- Forcing the knees down. Pressing your knees toward the floor with your hands stretches the hip capsule under load and can irritate the joint. Let gravity and time do the work.
- Sitting on the back edge of the cushion. This rounds the lower back and pushes the pelvis into a posterior tilt, the exact position that compresses the hip.
- Holding tension in the glutes. Gripping the glutes to "stay upright" tires the hip rotators and creates a deep, aching fatigue. If you're gripping, you need more height, not more muscle.
The goal isn't a perfect lotus. It's a pelvis that rotates forward, a spine that stacks with minimal effort, and a hip joint that isn't pinched by its own socket.
Meditation Cushion Height Guide: Finding Your Ideal Elevation
Your ideal cushion height depends on hip flexibility and leg length, not on what a product page recommends. The stiffer your hips and hamstrings, the more elevation you need. Here's how to measure it, plus a chart mapping the measurement to a height in inches.
Measure Your Hip Flexibility in 60 Seconds
Sit on the floor with your legs extended straight in front of you. Keeping your back straight, hinge forward from the hips and reach toward your toes. Note where your hands land:
- Hands reach past your toes, high flexibility
- Fingertips reach your toes, moderate flexibility
- Hands reach mid-shin, limited flexibility
- Hands reach knees or higher, tight hips
This is a rough proxy for hamstring and hip-capsule length, which determines how much your pelvis can rotate forward when you sit cross-legged. The tighter they are, the more elevation you need to get the knees below the hip crease.
Height-to-Flexibility Chart
| Flexibility Level | Hamstring Reach | Suggested Seat Height | Typical Setup |
|---|---|---|---|
| Tight hips | Hands at knees or higher | 7-9 inches | 2-inch base + 5-inch top cushion, or a 7-inch combined seat |
| Limited | Hands at mid-shin | 5-6 inches | Single 5-inch cushion, or 2-inch base + 4-inch top |
| Moderate | Fingertips at toes | 4-5 inches | Single 4-5 inch cushion |
| High | Hands past toes | 2-3 inches | Thin 2-inch base cushion alone |
These ranges assume an average leg length. If you're tall (over 6 feet), add roughly 1 inch. If you're short (under 5'4"), subtract roughly 1 inch. The goal is always the same: knees at or below the hip crease, pelvis in neutral or slight anterior tilt, spine stacked without effort.
The Ten-Minute Test
No chart replaces your body's feedback. Test any height the same way:
- Sit for ten minutes in your normal posture.
- If your knees ache or your hip flexors feel stretched, add height.
- If your hips feel strained, you're tipping backward, or your lower back aches, remove some height.
- If you can sit upright with minimal effort for the full ten minutes, you've found your starting height.
Re-test every few months: hip flexibility changes with practice, and a height that was right in month one may be too tall by month six.
Firmness Matters as Much as Height
Cushion firmness matters as much as height. Buckwheat hulls mold to your body and hold their shape, suiting people who shift position during long sits. High-resiliency foam gives a softer, more even surface that works well under knees and ankles. A cushion that compresses under your weight effectively loses height, so a 5-inch soft cushion may function like a 3-inch firm one after twenty minutes. When in doubt, choose firmer fill and adjust height with a base cushion underneath.
The chart gives you a starting point, not a verdict. Measure your flexibility, pick the matching height, then let the ten-minute test confirm or correct it. Height is the single biggest lever you have over hip pain during meditation, more than fill material, more than cushion shape.
Top Picks: Kusha Cushions for Hip Pain Relief
Kusha Cushions builds every seat around posture first, with a lifetime guarantee on cover and workmanship. Each piece comes out of 30 years of professional upholstery experience, and the materials and stitching show it.
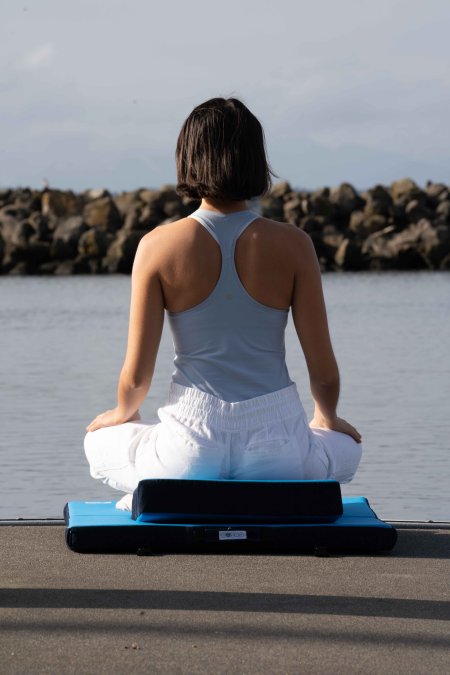
Moon Cushion: Buckwheat Support That Molds to Your Body
The Moon is a strong option for hip pain. Its crescent shape came from over two decades of feedback from long-time meditators, and the geometry does something a round cushion can't: it supports the hips and thighs in a position that naturally brings the spine upright.
At 5 inches high, the Moon sits lower than a taller seat and suits wider leg postures.
The one drawback: the crescent shape takes a session or two to get used to if you've only sat on round cushions.
Earth Moon Bundle: Complete Seat for Wider Leg Postures
For anyone who sits with a wide cross-legged stance, the Earth Moon Bundle is the better answer. It pairs the Moon with the Earth base for roughly 7 inches of combined elevation, enough to bring even tight hips into a neutral pelvic tilt.

The Earth base measures 2 inches high by 28″ × 28″. The 14 oz indigo-dyed bull denim and four-way stretch nylon cover is soft but durable. Together the two cushions work as one seat: hips elevated, knees and ankles cushioned, spine free to stack.
Where it falls short: it's two pieces to store and carry, and the combined height is more than flexible sitters need.
Earth Cushion: The Foundation for Knee and Ankle Comfort
The Earth is the quiet workhorse of the lineup. On its own it's a 2-inch base that supports knees, legs, and ankles, the right pick if your hip pain comes with knee or ankle discomfort from cross-legged sitting.
It also serves as the foundation for the Moon, so if you're unsure whether you need elevation, starting with the Earth lets you add the Moon later without replacing anything. Same indigo-dyed bull denim cover.
The honest limitation: at 2 inches, the Earth alone won't fix hip elevation. It's a base, not a complete solution for tight hips.
Cushion Maintenance and Longevity: Making Your Investment Last
A meditation cushion that flattens in six months was never built to hold you. Longevity comes down to cover care, and it is easy to manage once you know the routine.
- Spot-clean spills with soap and water as they happen
- Machine wash covers in cold water and dry on low heat
Foam-based cushions like the Earth need less attention.

Fill quality determines lifespan.
Stretches and Habits That Support Hip Health During Meditation
No cushion replaces hip mobility work. A short stretching routine before you sit makes any cushion more effective, and it's the piece most guides skip entirely.
Try this five-minute sequence before longer sessions:
- Butterfly pose, 60 seconds, letting the knees fall toward the floor
- Figure-four stretch on each side, 45 seconds per side
- Seated forward fold with a straight back, 60 seconds
- Cat-cow on hands and knees, 10 slow rounds
- Gentle hip circles while seated on your cushion, 30 seconds each direction
American Academy of Orthopaedic Surgeons guidance on hip conditioning recommends consistent, gentle stretching to maintain joint range of motion, which is exactly what cross-legged sitting demands.
Two habits matter as much as the stretches. First, build session length gradually; adding five minutes a week gives your hips time to adapt. Second, stand and walk for a minute between sessions. Hip stiffness often comes from total time in one position, not the position itself.
Frequently Asked Questions
What is the best cushion for hip pain during meditation?
A cushion like the Moon works well because it keeps hips elevated and the spine upright. Pair it with a base cushion such as the Earth for knee and ankle support. The key is sufficient height and firmness so your pelvis tilts slightly forward, reducing pressure on the hip joint and sciatic nerve.
How does a meditation cushion help with hip alignment?
Raising your hips above your knees creates a natural forward tilt of the pelvis, which lets the spine stack upright without muscular effort. This reduces compression in the lower back and takes pressure off the hip joints. A cushion with a contoured shape, like the crescent Moon, also supports the thighs and encourages a wider, more stable base.
Can the wrong meditation cushion cause hip pain?
Yes. A cushion that is too low or too soft lets your hips sink below your knees, forcing the pelvis to tuck and the lower back to round. That position strains the hip flexors and can pinch the sciatic nerve over time. Choosing a cushion with adequate height and firmness for your flexibility level is essential for comfortable sitting.
What features should I look for in a meditation cushion if I have hip pain?
Look for height that elevates your hips above your knees, a filling that holds its shape, and a contoured or crescent design that supports the thighs. Kusha Cushions offers a lifetime guarantee on covers and workmanship, so you can try one without worrying about durability.
Hip pain shouldn't be the reason your practice stalls. Kusha Cushions builds seats that hold their shape for life, backed by a lifetime guarantee on cover and workmanship, so the only thing you adjust is your height, not your cushion. Start with the Moon for targeted hip support, the Earth Moon Bundle for wider leg postures, or the Earth as a foundation you can build on. Get started with Kusha Cushions and sit through a full session without your hips deciding when it ends.